Sunday, September 22, 2019

Baby Baths in a Farmhouse Sink (Part 1)


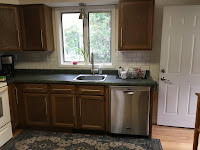
 So, how adorable are these photos? I might have fallen into the depths of consumerism and the quest for a "perfect" home but bathing our firstborn in this sink would be dreamy. The only problem is, well, the cost of course but also how on earth do you retrofit one of these massive buggers into a space surrounded by 80's cabinetry and laminate counter-tops? 

I thought about this for some time and the solution appeared. I have matching trim I removed when I installed our pendant light. It was a useless decorative trim piece but I'm glad I didn't throw it away because it's a perfect match. Not only that but when I bought our (new-old) stainless fridge this past spring I had to take out the small cabinets above it because the fridge didn't fit. 

So then it just becomes a question of framing up the sink to support the weight and reconfiguring the smaller cabinet door faces underneath. Typically, on a lot of these farmhouse sink posts, you'll see that they just added a curtain down there but with a baby on the way, we're going to want some doors we can child lock!


Coming Soon...Part 2...The countertop issue.


Friday, April 12, 2019

Refinishing Our Floors Pt.3


Finishing
Finally, the last and most satisfying phase of refinishing our floors. The final rounds of sanding were bittersweet. This is what the floors originally looked like when the home was first built and before they were treated with a thick, dark lacquer. 
Again, you can see the lovely plywood used in the upstairs as a filler. 


We decided to go with a natural, water-based polyurethane with no added tint. The previous homeowner recommended we use Varathane brand (now owned by Rust-oleum). He said it was by far, the easiest to work with and was a self-leveling, long-lasting hard finish. I was absolutely clueless what any of that meant anyways but sure enough, Varathane receives glowing reviews online and I am glad I went with them. You can also see all the different products you'll need to ensure a professional looking, refinished floor. 

You'll need the following: 
Pole Longarm Extension (multi-purpose tool: sanding/finishing/painting/drywall!)
Plastic Pole Sander (cheap, plastic ones work just fine) 
Varathane Applicator (go high quality on this so you don't see little fibers everywhere)
Tack Cloth (Pack of 6) 
3M Sanding Screens (100 or 220 grit)
Wooster Shortcut Angle Brush (I just LOVE these brushes for everything)
Knee Pads or Thick Cardboard
New Pair of Sythentic Socks (non-cotton)


The Process: 
So I'm not sure if I have any photos of the process of actually applying the floor finish. At this point, I believe my wife was busy at the old apartment boxing things up or working on grading papers. In any case, I'll detail the tedious/perfectionist steps I took to ensure the best results possible.

You'll be excited at this point but if you haven't already -- fill in any holes now. Don't use the sandy wood filler stuff from Minwax, buy the smooth puddy version. You'll fill in random nail and staple holes from the carpet strips. Don't worry about any gaps in the flooring but you may want to take a flat-head screwdriver and the shop-vac back out to clean them out now depending mostly on how gross it looks. 


The biggest thing is being patient and allowing enough time on a Saturday or Sunday to have the whole day to work on this project. That includes going out to lunch between coats. I decided to split my time between the upstairs and downstairs and utilize my time equally between the two. 

First, you'll need to shop vac the whole room. See those curtains in the photos? They are COVERED in fine wood dust. See all the wood trim? See the radiators? Dust everywhere. Shop-Vac everything and take everything down. You'll be thankful you did. After vacuuming, you can slip on your knee pads or find a piece of forgiving thick cardboard to spend a good deal of time on the floor. You'll be using the mineral spirits and your tack cloth on the whole room. Starting at the corner and slowly work make passes across the whole room top to bottom. After each pass, you'll need to shake out your tack cloth in a designated corner and re-fold it when necessary. 


After that, you can start pouring! I just dumped globs right on the floor and worked it in. Do your best to ensure you're working with the wood grain and evenly spread it out. There's some debate on the internet regarding how many coats you should add and how thick each coat should be. I went with four thin coats and a thicker one to finish. 

See that line? We couldn't get it out - maybe a piano was slid across the floor at one point? Who knows. By the way, something I didn't think of at the time was what to put on my feet? My feet might as well be tack cloths because they picked up everything. I opted to use sacrifice some synthetic socks for the sake of the project -- cotton ended up sticking and leaving threads.

So, on the can it will give you recommended drying times between each coat. Again, humidity can play a big role. After completing this process in the upstairs and eating lunch, it was time to apply the second coat downstairs. This is where my perfectionist/OCD tendancies came into play. You don't HAVE to sand between coats. Especially if you're going to put on thin ones but I did anyways. I took a super fine drywall  sanding screens and swept the floors with them. Now I had to repeat the whole tack cloth/mineral spirits process over again. I just felt like this would help to acheive the best floor possible. In hindisght, I would recommend maybe one sanding in the middle coats. 

I'm glad I split my time between rooms because by the time I was done sanding and snacking downstairs, it was time to re-apply the next coat upstairs. Overall, I think it turned out fantastic. I'd recommend waiting at least two days if you have time and it hasn't been especially humid before you start moving furniture into place. This stuff hardened up really nice but I still wouldn't go throwing down any rugs for a while. 

Now it was really starting to look like home. We even moved the bed upstairs and decided to spend our first night together in the house.   Warm and invitingMorning coffee 

Sunday, April 7, 2019

Refinishing Our Floors Pt.2

So with the floor cleaned up, we come to our next (and most challenging) phase of this project -- sanding. Ugh. We rented our sanders locally and I incorrectly assumed I could smash out this project in two days flat. We ended up renting the equipment for double that and with the help of friends and family, we worked on these floors all weekend and into the next week. The thick carpet glue and thick lacquer finish were mostly to blame. (they never showed that part on Fixer Upper!)  


Prep: 
Tape up any rooms you don't want dust in because most of it will go into the bag but the rest of it will be everywhere. Watch Youtube videos or talk to any fellow homeowners who have already sanded their floors. They will provide you with a wealth of information and advice. 

*Be warned: anyone can upload a Youtube video so make sure you watch a number of videos as this Simon Cowell of wood sanding will love to share with you.


Tips: 


  • We've been told countless times to avoid random orbital sanders so we went with a highly rated belt sander. 
  • Purchase the coarsest sandpaper available (30-40 grit) and don't worry, you'll gradually polish it out to the fine stuff. You'll need quite a few of these because they'll all gook up with all the melted lacquer finish and/or carpet gum. 
  • Purchase more sandpaper than you need (6 sheets of each grit at least). Check to make sure your store allows returns for unused pieces.
  • Rent your machines as early as you can -- you'll only need the belt sander for the first day but if you're feeling ambitious or you only have one room to work on, you could also rent the handheld edger.
  • By the way, these buggers are heavy. Get help anytime you lift them upstairs or into your truck.
  • My wife was happy she had a face mask -- the 3m filters were coated with fine wood dust. I'm sure I probably inhaled an unhealthy amount during the process. 


I've uploaded videos below of the techniques we used for sanding. The biggest thing is to remember you must have continuous movement and tapering off when meeting in the middle of your floor, otherwise, you'll most certainly have sanding marks or impressions in your floor.


Saturday, April 6, 2019

Refinishing Our Floors Pt.1

Although I was quite certain our house has wood floors throughout, I wasn't positive what kind of flooring we'd find underneath the carpets upstairs (we've seen basic planks used in older homes upstairs). There was a very exciting HGTV Chip/Joanna feeling pulling them up for sure! 
We had some debate whether or not to remove the early 2000's beige carpeting in the master bedroom but ultimately decided to remove it, not knowing what challenges lay ahead. As you can probably see, there used to be two bedrooms at one point. The floors looked just fine on one side but there was an exceptional amount of old carpet glue and thousands of staples/nails on the other. Luckily for us, all the flooring was the same throughout the house -- old growth maple with some curly and tiger eye thrown in randomly here and there!
Another thing you will notice is the plywood was used to fill the gaps in the middle where the old wall used to be --not a pretty sight that we'll need to address in the future! This part of the project chewed up our fingers pretty good -- you certainly never see this on HGTV! Safety glasses and work gloves were an absolute must for this portion of the cleanup. Countless times I had staples come shoot right up into my face. I would also highly recommend several different size crowbars, a hammer, pliers and a flat head screwdriver for this project. 


Next up, sanding


 Prepare for hours of this.


Cya carpet!

Monday, March 18, 2019

Project Homeowner: Painting

Project Homeowner: Painting

So I knew right away I wanted white walls. There was certainly nothing terribly wrong with the khaki color paint but it felt dark and drab. 

My biggest source of inspiration was Audrey Bodisco's lovely instagram. Her unique style was the perfect blend of boho/mid-century modern/southwest that best defined us. Another big plus, is she has the same warm orange pine trim in her whole house. 


In fact, I would say 80% of the trim in our house was painted at one time in its life before the previous owner chemically stripped all of the old layers of paint off. Originally the wood was a bit darker as seen on the baseboards here. After stripping the paint it also took off the original dark lacquer and left a beautiful golden color you see now. 


Audrey told me she went with a warm white called "Swiss Coffee" by Benjamin Moore. Of course, we don't really have a Benjamin Moore paint store here but our local Sherwin Williams was able to pull the exact color blend codes and mix up several cans for us.


When you Google image search a paint color, it's really amazing (and a bit intimidating) how different hues of white can affect the entire atmosphere and feel of a room. However, I went with my gut and it paid off. I just knew it was be the perfect shade after we started our first coat! Prep work for this took the most amount of time. One big pet peeve I have whenever I walk into a home is when homeowners paint around their outlet covers (it's only two screws!). Allison and I really took our time and the results paid off. 
The big lessons I learned were:
  • Remove painter's tape right away after you're finished
  • Remove outlet covers and buy new ones (they're dirt cheap)
  • Keep a hot, damp rag around and wipe clean any drips on trim/floor right away
  • Roll in random patterns and stick with multiple, light coats. 
  • Invest in quality rollers/paint brushes and then wash them right away afterwards
  • Don't paint when it's humid/raining out!
  • Take pizza breaks 


Pizza breaks are important essential.

Our First Home

So we bought our first home! It was a funny story really. We had spent months looking at houses and even put in offers on two homes we thought were "the one." When you start dreaming and imagining yourself in a home only to lose it to another buyer, you understandably tend to feel a bit defeated. 

So, we stopped looking for sometime, mostly because we had seen everything that was listed worth looking at and thought we'd wait until the spring for the next batch of new listings. Early in the spring, we looked at a fairly large 4 bedroom home across the street. As we were both getting into our cars, a man kind of waved at me from the house across the street and I stepped back out of my vehicle. He asked if we were interested in looking at his home because he and his wife were thinking of listing it in the spring. I looked over at my wife and we both said "sure!" Long story short, we fell in love with the house, forgot all about our realtor and signed the papers at the bank that spring. 

Baby Baths in a Farmhouse Sink (Part 1)   So, how adorable are these photos? I might have fallen into the depths of consumerism and the...